Showing posts with label nails. Show all posts

Sunday, December 18, 2011

My Beauty Life Lately: Pictures

Long time no write! Once again, I've broken a promise on here. I have so many ideas for posts (eyebrows, beauty resolutions, tutorials for all sorts of eye shadow, fashion, etc.), but laziness always wins. I have been newly inspired lately by Pinterest, a virtual "pinboard" of sorts, where users can post inspiration for a variety of things.
Some of the makeup and nails are truly gorgeous and they push me to try new things. I've recently made a big change hair wise as well- I stopped washing my hair every day, and now only shampoo every other. Though it was hard at first, my hair adjusted within a few weeks, and it saves a lot of time. Now if only my hair would start growing more quickly... I do notice changes in terms of health though, which I'm happy for. We're on Christmas break now, which will hopefully translate into some new posts- I have a lot to say, but often can't be bothered to take the accompanying pictures. I know, that's no excuse. Anyway, here are a few of the more recent things that I've managed to photograph. Enjoy! :)


Nothing super special, just sort of a new technique: using brown eyeliner as a base and mainly dark colors on the lid. Brown on brown eyes is underrated :)


My Thanksgiving makeup! I didn't go anywhere, but I still wanted to do my makeup sort of holiday-ish, hence the fall colors.


Tonight's project, galaxy nails! Excuse my horrid edges- and that's after cleaning it up. These really do look so cool, and aren't as time consuming as a lot of other detailed nails. It takes a lot of nail polish, and a sponge (I use clean makeup applicators, available for purchase at most stores), but other than that, nothing special work wise. I've got to stop picking my nail polish off- I like doing things like this, but it's usually wasted because of how quickly I pick it off.
Anyway, I really do hope to write more this week. I've let my other blog go as well; the past few months have been rough, but things are getting a lot better. Hope everyone is having a good almost Christmas :)

-Rhiana

Wednesday, December 7, 2011

Konad Tutorial

I ordered my Konad stamping kit several months ago and decided I need to finally write about it! I love it. It is really cool! It is kind of messy but easy to use and to prove it, I have a tutorial!

To use the Konad, you need a stamper, scraping tool, and design plates. I ordered a double sided stamper. The large side is great for all over design and the small end is good for small images. I also ordered six image plates to start out with: M65, M61, M57, M60, M63, and M71.


Onto the tutorial :)This manicure looks really similar to Sally Hansen Nail Effects in Misbehaved, which is what originally inspired me.


1. Clean and prep nails as usual. Apply a base coat if desired, and let it dry. Apply 2-3 coats of a base color. This is the color that will show through the Konad print. This is two coats of one of my favorites, Orly Rage.


2. Make sure all Konad tools are cleaned with non acetone nail polish remover and cotton swabs. Place the stamping plate on a paper towel, because it gets really messy. Use a thick nail polish and paint it over the design that you want to use. The company will try to tell you that this only works with their "special polish" but this is not true. Any nail polish will work of it is medium to thick consistency. For this manicure I used Sinful Colors Black on Black and Konad plate M57.


3. Use the scraping tool and slide it across the image that you want to stamp to scrape away the excess nail polish.


4. Use the stamping tool and roll it across the image to pick it up. This step must be done quickly or the polish will dry and the stamper will not pick it up.


5. After aiming the stamper, roll it across the nail to transfer the image.


6. Clean up around the edges with polish remover and a cotton swab, apply a top coat, and thats it! Messy but so cool! And so easy to do :)


I really do love it. I have had the opportunity to do this on several other girl's nails and it is a lot of fun. I want more image plates from both Konad and Bundle Monster. Christmas!

Hope this is helpful!

Naomi

Saturday, October 1, 2011

Vintage Flower Nails and My First Half Moon Manicure

I haven't blogged in a really long time. It feels good to do it again, actually. I hope I can fix this bad habit of never updating. I have pictures of two manicures I decided to try in these last few weeks that I wanted to share. First I tried vintage roses with nail brushes. Here's how it turned out!

I used China Glaze For Audrey as the base color and Orly Two Hour Lunch, Essie Lady Like, and OPI Don't Mess With OPI for the roses, and Seche Vite as my topcoat. I would have taken pictures for a tutorial but forgot. I really loved it! Definitely one I will do again.

Next is my first attempt at a half moon manicure and a tutorial to go with it. To start, clean and prep nails as usual, and apply a protective base coat and two coats of a base color. This is the color that will show through in the end. My base coat is from Nail Magic and my base color is Essie Lady Like.


You want to let your base color dry completely before moving onto the next step. This is very important! I gave mine an hour just to be safe. You will need these reinforcement stickers for the next step.


Cut the stickers in half so they lay on the nails better. Place a sticker at the base of each nail. The most important part here is that you keep the amount of nail covered by the sticker consistent. You want each half moon at the base of the nail to be the same size. Press down the edges really well.


Take a darker polish and paint over the stickers, covering the part of the nail that is showing. I used Essie Power Clutch. Let the second color dry completely, then pull the stickers off slowly and gently, pulling away from the base of the nail.


Apply a topcoat and you are finished!


I actually really loved the way this turned out. But it is not something I will do often because of the amount of time it takes. This simple looking manicure took me an hour and a half, and it ended up chipping two days later. It is unique and really pretty but a lot of work so I will probably not be doing it very much.

That is all for now. Hope everyone is having a great weekend.

Naomi

On a side note, I just ordered a Konad nail art kit with five or six plates and I cannot wait to get it! :) I'll post about it soon!

Tuesday, July 12, 2011

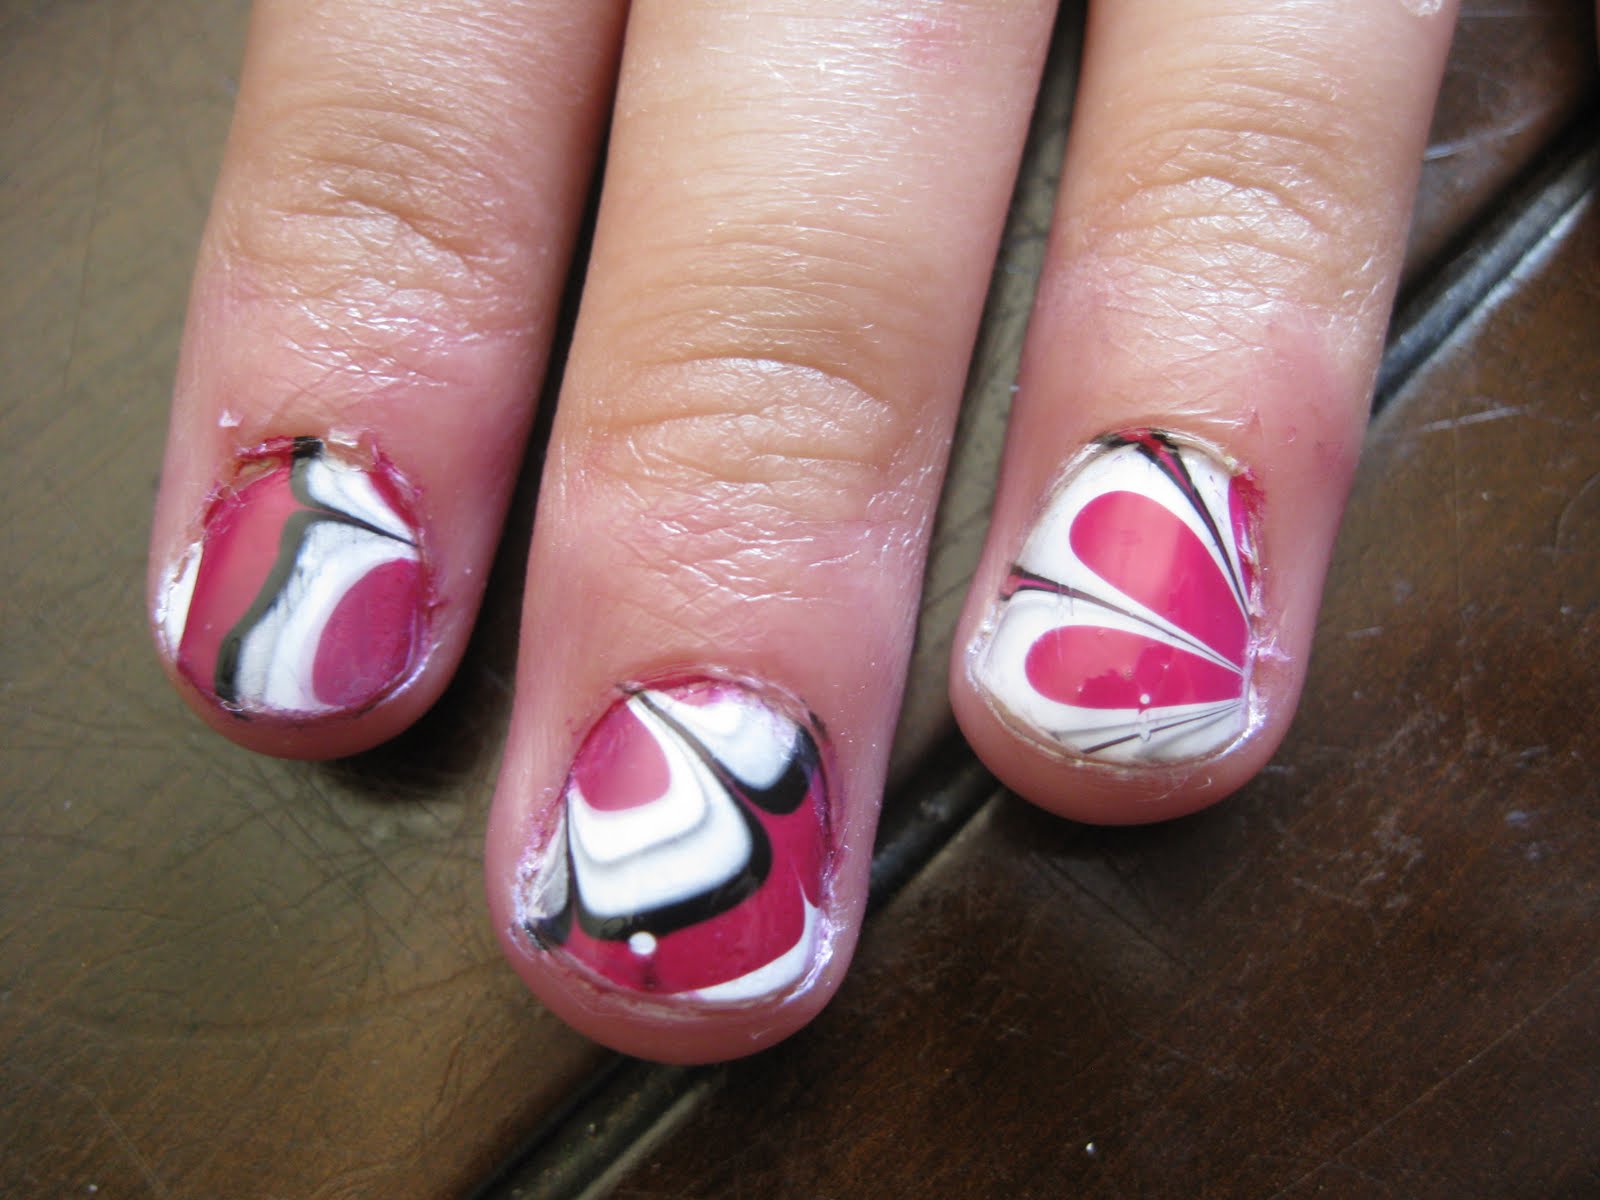
Tutorial: Water Marble Nails

I have been wanting to try new things on my nails and have kinda been stuck. I came across this awesome technique a few months ago but never tried it until a few days ago and now I cant get enough of it! Its really neat. I did it for three of my sisters and three friends and on myself :). So I'm doing my first tutorial on it :).

You start out by taping off your nails. This part can take a lot of time depending on how you tape your nails but I think its kinda worth it cuz it keeps your hands clean. Then paint your nails with one coat of a white polish. I use China Glaze White on White.

Get a small cup (I used a plastic one but any small glass or plastic cup works. Try not to use one any bigger than this.) and fill it with room temperature water. Pick you colors and decide what order you want them to go in. For this look I used OPI No Spain No Gain, China Glaze White on White, and Nicole by OPI Razzle Dazzler. Picking colors is definitely my favorite part :). Then add one drop of a color to the water, then another color on top of that, then another and so on until you have created a sort of bulls eye. You can use as many colors as you want to do this.

Then use a toothpick to create your design. I used the toothpick to pull the edges to the middle to make a flower. This part can be frustrating. If you mess up, blow on the water a little bit to dry the polish quickly and use a cotton swab to wipe it out of the water. You do not need to change the water each time you make a new bulls eye.

When you finish creating your design, dip your finger into the water. I suggest doing two fingers at a time and thumb by itself. It helps save time and nail polish and it still turns out really nice. Once you dip your fingers, leave them in the water until you can take a cotton swab and wipe the excess polish out of the water. Then gently take your nails out of the water, pull off the tape, clean up the edges of your nails with a cotton swab and some nail polish remover, and apply a top coat. And you end up with really beautiful unique nails. :)

They turn out so gorgeous. Here are a few others I've done...

Zoya Yummy, Nicole by OPI Razzle Dazzler, and China Glaze White on White.

Essie French Affair, Orly Ancient Jade, Nicole by OPI Razzle Dazzler, and OPI No Spain No Gain.

Sinful Colors Timbleberry, Sally Hansen Sun Kissed, and China Glaze White on White.


Zoya Caitlin, China Glaze White on White, and Nicole by OPI Razzle Dazzler.

China Glaze For Audrey, China Glaze Secret Peri-wink-el, and Zoya Dove.

And these are mine :). Sinful Colors Timbleberry and China Glaze For Audrey.

Loving this look! Give it a try. Have a good week everyone! :)

Naomi

Thursday, June 23, 2011

My Latest Obsession and Polish of the Week

My latest obsession... Neutral nail polishes. My collection of these little beauties is growing and I just had to get a picture. In order: Revlon Iced Mauve, Milani Disco Lights, Sonia Kashuk Tauped, OPI Barefoot in Barcelona, Essie Sand Tropez, China Glaze Fifth Avenue, Essie French Affair, and Mauve from Forever 21. Love them.


Rhiana bought me this one for my birthday. OPI Barefoot in Barcelona. Love it.

And my polish of the week: Zoya Dove. With some cute little stickers :) I messed up my pinky a little bit. And this was taken a few days after I painted them so the edges are a little worn but for the most part, I loved the way it turned out.


I'll try to post again this weekend. But that's it for now. :)

Naomi

Tuesday, April 19, 2011

My Excessive Collection of Nail Polishes

(and I still don't have all the colors I want ahah.)

Well as the the title of this post says, I have purchased myself quite a large collection of nail polishes. I bought three over spring break, and my mom bought me five over the weekend (instead of getting a manicure for prom.) On to pictures :)

These are the ones I got over break. In order: No Spain No Gain from OPI, Mauve just from Forever 21, and Don't Mess With OPI from OPI, obviously.

And these: Fifth Avenue from China Glaze, Watermelon Watercolor from Finger Paints, Pretty as a Portrait from Finger Paints, Ancient Jade from Orly (This is my first polish from that brand. They spelled "ancient" wrong on the bottle. WOW.), and China Rouge from China Glaze.

They are all so pretty. So far I've only used Fifth Avenue but sadly forgot to take pictures before I started chipping them off... I'll paint them again tonight. I'm feeling Ancient Jade.

More pictures of pretty things I bought over the weekend.

Nail brushes from Sally Beauty, setting spray from Makeup Forever and two eyeliners. The blueish one is Flashy Green and the purple one is Wild Spirit. How pretty.

K time to be done. :)

Naomi

Saturday, March 26, 2011

Accent Nails

Such a cool look! And yes it really is a look! Some of my favorite ways its been done:


Its so cool with the glitter. I want to buy some glitter polishes.

This one looks kinda messy but I think its a cool idea with the Crackle Glaze.

So cute! I loved it so I tried the look myself. This is how it turned out.


The lighting is really bad and the pictures didn't look blurry til I put them on the computer. Sigh. O well. Cool huh? :) I like it. I used For Audrey from China Glaze and Electric from Revlon for the accent nail. I got some bratty comments from some foolish boys, but what do they know anyway. It wont stop me from doing this again, ha.

Naomi